
In order to snag the free collaboration kit below, you must collect a part of a code from every blog you visit. Put the items together in order and you will have a coupon code to redeem on the site for your free collaboration kit, Sweet As Spring.

Twelve designers contributed a total of 67 elements, 51 papers, and 4 alpha sets to this gorgeous
kit, and the treasure is worthy of the journey. But, in addition, everyone who downloads the kit before
Wednesday, March 27, will also be entered into a drawing for a $15 gift certificate to the Design House Digital shop!
We have a challenge for you, too: build something amazing of your own! Using just the Sweet as Spring collaboration kit (and your own photos, of course), create your own project and put it into our Sweet as Spring Challenge Gallery. If you post your project before April 17, you will be entered into another drawing for a $15 gift certificate to the Design House Digital shop, but the challenge gallery will remain open afterwards, and we would love to see your layouts any time.
And that's not all. If you want even more goodies that coordinate with this kit, be sure to "like" DHD on Facebook (here) and to sign up for the store newsletter.
Before I get to sharing my part of the code, I want to talk to you a little bit about ombre. The ombre trend has been budding all around us for a while. From fashion to home decor, from food to craft, adding a bit of ombre can really add some fun to your life! I've created a board on Pinterest to give you some examples too so take a look.
And I'm going to show you one simple way to add a little ombre to your layout using the gradient fill tool. Here's what you need to do:
1) Choose a background paper
2) Choose something to overlay onto the paper (ie: a background overlay, a brush, or even some text)
3) Create a layer above your overlay layer
4) Set your foreground and background colors. These will be the two colors that the gradient blends.
5) Use the gradient tool to fill the layer (ombre is generally top to bottom but you can mix it up if you like) You can also play around with your gradient tool as much as you want. Go from the background color to nothing, fade to a lighter shade of that color, fade to another color completely, or even add additional stops with other colors.
6)Clip the fill layer to the overlay layer and presto!
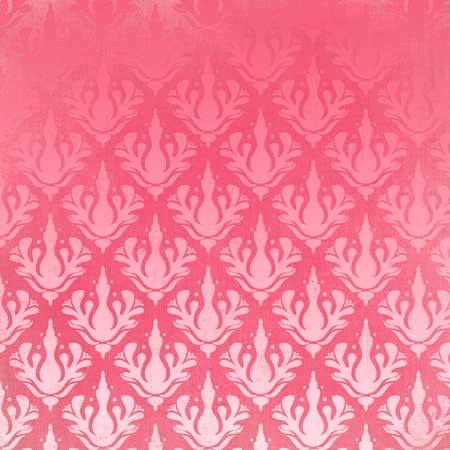
Here are a few examples using a paper from Be Bold and a damask pattern from Just Basics Distressed Overlays.


These are just a few of the ways you can add a little ombre to your layouts! What other ways will you use it?
Well, thanks for stopping by! You can visit as often as you like, and you can also like me on facebook for more inspiration and updates. And finally, here is the item you are looking for!!

You can use the list below of all of the stops in the blog hop, or you can jump directly to the next blog:http://scrapznbitz.blogspot.com/
Design House Blog- Start here!
Sarah Sullivan
Vanessa Fenton
Inkling and Wit
Diane Rooney
Mary Moseley
Kristin Damon
Imaginenation
Courtney VanSickle
Kandy Caballero
Krystal Winn
Tracey Allen
Qadirah Gomez
Kelly Birrell
Amy Lanham
Sweet as Spring – a blog hop treasure!
Wey hey - looking good Sarah :)
ReplyDeleteLove your quick tutorial Sarah
ReplyDeleteThis is very neat will have to try it!
ReplyDeleteOoh! Love the tutorial!
ReplyDeleteThanks for the tip. I will definitely try that one.
ReplyDeletecan't wait to give ombre a try. thanks for the easy to understand directions.
ReplyDeleteThank you for your wonderful portion of the awesome kit!
ReplyDeleteLove the tute and thank for your part :)
ReplyDeleteThanks for the tutorial and the lovely colab!!!
ReplyDelete