Just wanted to post a little update to share some of the new items I've placed in my Etsy shop!
I have two new home decor items available. The first is for all those Packer fans our there! It's a tribute to the Pack in the form of subway art and is available as at 16x20 inch download of high-quality ready for printing! It would look perfect on canvas and makes a great gift for that hard to shop for person on your list.
This item is available for instant download and is available in 4 color variations. Pictured is the green and gold. I also have white lettering on both green and gold backgrounds, as well as one print that is available in the throwback colors. Of course, custom coloring is always an option - just contact me.
Also new is a set of three prints perfect for a children's bathroom. Again, also subway art.
The bathtime print is formatted at 8x10 inches and the two others are formatted at 5x7 inches making this a great trio to hang together, but they also work great separately.
Finally, I have one additional commercial use item available. It's a digital chalkboard background sized at 16x20 inches making it perfect for those larger projects.
I hope you'll swing by my shop to check out these and all the other items I have for sale.
Saturday, November 23, 2013
Tuesday, October 29, 2013
Crafting for Christmas
Did I just type "Christmas?" I did, I know, right? It's not even Halloween but the store shelves are lined with Christmas goods and have been for weeks. And the Christmas scrapbook collections are also hitting the shelves and providing inspiration for fun holiday projects. I've got a few handmade gifts I want to create for this year and I know how time flies so I am starting early. When I saw the new Heidi Swapp Believe collection I knew I wanted to use it. Since I'm always giving away my handmade albums I figured it would be a great time to make one for my family to keep. I saw the memory file kit for the Believe collection and snagged it up so I could get my Christmas craft on.
The kit comes with two large memory file folders and two small in different front/back designs. Also included are rub-on embellishments file tab stickers and one foto stack. I also purchased the coordinating sticker pack, 6x6 inch pad and the ephemera pack. I highly recommend the ephemera pack as it is filled with an additional 94 pieces of goodness that will get your creativity flowing. Before I move on I have to admit, I actually purchased three of the memory file kits so I could make two more to give away. I know, it's a problem I have but I love a good handmade present!
I've tried doing December Daily in the past and made it pretty far but I know I won't be able to keep up this year with my two littles on the move so I set out to create the foundation of an album that would help me document the fun our family has in preparation for Christmas Day. Our kids are little so we are still forming traditions but I knew there would be certain things we would do such as decorate, celebrate St. Nick's, and a visit to Santa. The rest of the album I left pretty general and will continue to fill up and embellish but it's a great step forward to have the foundation completed - or I may never get it done!
I decided to cut apart the two large memory files and one of the small ones to make my album pages. I used my cinch and .75" white wire binding to put it all together. Here is a look at how it came together. Sorry the pictures are not so great, it was a rush to get them!
I kept the cover fairly simple with a cluster of fun embellishments and noted the year in the bottom right. The paper stack has one design that is a bunch of journal cards, at the 6x6 size they are mini journal cards and worked perfectly as embellishment throughout the book. For the first inside pages, I trimmed the top of a paper and glued down the bottom and both sides to make a pocket. A few more trimmed pattern papers with a tab punch out on each tucked neatly behind providing additional space for photos or journaling.
Watching how the kids react to Santa year after year is pretty fun so I made sure to leave plenty of space in this mini file to document the visit! Yeah those are my post its telling me what I have in mind to put there. It is only October so I just might forget before I complete the album!
Here is the foto stack that comes with it. I decided to leave it together and just added a few embellishments. You could rip it apart to use as little pockets or as photo mats throughout your album.
On the last page I had fun decorating the second mini file with the countdown stars from the ephemera pack. I know I won't keep up with pictures each day but I thought it would be fun to have a little journal to jot down some of the things we do.
And there it is, ready for our holiday fun! I'm looking forward to completing this album and having it to look back on.
The kit comes with two large memory file folders and two small in different front/back designs. Also included are rub-on embellishments file tab stickers and one foto stack. I also purchased the coordinating sticker pack, 6x6 inch pad and the ephemera pack. I highly recommend the ephemera pack as it is filled with an additional 94 pieces of goodness that will get your creativity flowing. Before I move on I have to admit, I actually purchased three of the memory file kits so I could make two more to give away. I know, it's a problem I have but I love a good handmade present!
I've tried doing December Daily in the past and made it pretty far but I know I won't be able to keep up this year with my two littles on the move so I set out to create the foundation of an album that would help me document the fun our family has in preparation for Christmas Day. Our kids are little so we are still forming traditions but I knew there would be certain things we would do such as decorate, celebrate St. Nick's, and a visit to Santa. The rest of the album I left pretty general and will continue to fill up and embellish but it's a great step forward to have the foundation completed - or I may never get it done!
I decided to cut apart the two large memory files and one of the small ones to make my album pages. I used my cinch and .75" white wire binding to put it all together. Here is a look at how it came together. Sorry the pictures are not so great, it was a rush to get them!
I kept the cover fairly simple with a cluster of fun embellishments and noted the year in the bottom right. The paper stack has one design that is a bunch of journal cards, at the 6x6 size they are mini journal cards and worked perfectly as embellishment throughout the book. For the first inside pages, I trimmed the top of a paper and glued down the bottom and both sides to make a pocket. A few more trimmed pattern papers with a tab punch out on each tucked neatly behind providing additional space for photos or journaling.
Watching how the kids react to Santa year after year is pretty fun so I made sure to leave plenty of space in this mini file to document the visit! Yeah those are my post its telling me what I have in mind to put there. It is only October so I just might forget before I complete the album!
Here is the foto stack that comes with it. I decided to leave it together and just added a few embellishments. You could rip it apart to use as little pockets or as photo mats throughout your album.
On the last page I had fun decorating the second mini file with the countdown stars from the ephemera pack. I know I won't keep up with pictures each day but I thought it would be fun to have a little journal to jot down some of the things we do.
Thursday, October 3, 2013
DIY Coffee/Espresso/Latte Mugs!
For a while now I've been interested in trying a project with vinyl. Trying to decide what has always been tough and it's never moved to the tops of the list. But then, inspiration hit! So now I have completed my very first project with vinyl using my Silhouette and I'm pretty happy with the results.
For our tenth wedding anniversary, my husband and I had thought we'd be talking a trip somewhere enjoying sun and calm, but really our little ones weren't ready for us to have an extended time away. So instead, embracing the life we have, we treated ourselves to an espresso machine. It's been wonderful and we still enjoy it several months later! Espresso, lungo, cappuccino, and lattes all at the touch of a button. For a tired person in the morning, it really doesn't get better than this. My husband ordered some great espresso and latte mugs from Crate & Barrel for us to use. They are plain white, which I do like but I sort of also saw a Silhouette vinyl project waiting to happen. So today, I thought, why not make that happen. Here is the end result:
I thought it would be fun to drink an espresso while putting a mustache on! And then I couldn't resist some great word art for the latte cups. It was really fun designing the items to print but the whole process was a bit more work than I thought it would be. However, I have to mention that I probably should have picked a much simpler project to start with. But then, I wouldn't be me.
Once I had the designs ready to print in the Silhouette software I went about loading the vinyl. You're told you don't need a cutting mat and that you can just load the roll but I really couldn't get that to work despite looking for many tips and tricks online. I ended up cutting a strip of vinyl and using my cutting mat.
After it's all cut, you have to strip away the excess vinyl and "weed" out the little parts. This is where I went a bit crazy since I had picked a fairly intricate design but overall it wasn't that bad. You definitely need all those little tools Silhouette recommends though!
Then I adhered the transfer paper and went about getting the designs onto the mugs. So I knew I'd have to deal with the curvature of the mugs; however, I didn't think it would be as hard. The transfer paper actually seemed to work against me a bit during this process as it is a heavy paper and as you bend it, it creases. The first design I did wasn't so hot. After removing the transfer paper, I lifted a few items up to fix them. Working slowly and creasing the transfer paper in between design elements, I was able to have more success with the second mug. That all being said, in the end, I wasn't too impressed with how the vinyl stuck to the mugs! I hope it holds up well! I do hand wash these, so I hope that adds to the longevity.
All in all, I'm glad I gave it a try. I don't think the project took that long but I was chasing toddlers in the middle of it so it felt like it took forever! I love the word art I created for the latte mugs and could easily see it as a print as well. I'm sharing it with you for free for your PERSONAL USE ONLY. You can grab it here.
Now, what next?
For our tenth wedding anniversary, my husband and I had thought we'd be talking a trip somewhere enjoying sun and calm, but really our little ones weren't ready for us to have an extended time away. So instead, embracing the life we have, we treated ourselves to an espresso machine. It's been wonderful and we still enjoy it several months later! Espresso, lungo, cappuccino, and lattes all at the touch of a button. For a tired person in the morning, it really doesn't get better than this. My husband ordered some great espresso and latte mugs from Crate & Barrel for us to use. They are plain white, which I do like but I sort of also saw a Silhouette vinyl project waiting to happen. So today, I thought, why not make that happen. Here is the end result:
I thought it would be fun to drink an espresso while putting a mustache on! And then I couldn't resist some great word art for the latte cups. It was really fun designing the items to print but the whole process was a bit more work than I thought it would be. However, I have to mention that I probably should have picked a much simpler project to start with. But then, I wouldn't be me.
Once I had the designs ready to print in the Silhouette software I went about loading the vinyl. You're told you don't need a cutting mat and that you can just load the roll but I really couldn't get that to work despite looking for many tips and tricks online. I ended up cutting a strip of vinyl and using my cutting mat.
After it's all cut, you have to strip away the excess vinyl and "weed" out the little parts. This is where I went a bit crazy since I had picked a fairly intricate design but overall it wasn't that bad. You definitely need all those little tools Silhouette recommends though!
Then I adhered the transfer paper and went about getting the designs onto the mugs. So I knew I'd have to deal with the curvature of the mugs; however, I didn't think it would be as hard. The transfer paper actually seemed to work against me a bit during this process as it is a heavy paper and as you bend it, it creases. The first design I did wasn't so hot. After removing the transfer paper, I lifted a few items up to fix them. Working slowly and creasing the transfer paper in between design elements, I was able to have more success with the second mug. That all being said, in the end, I wasn't too impressed with how the vinyl stuck to the mugs! I hope it holds up well! I do hand wash these, so I hope that adds to the longevity.
All in all, I'm glad I gave it a try. I don't think the project took that long but I was chasing toddlers in the middle of it so it felt like it took forever! I love the word art I created for the latte mugs and could easily see it as a print as well. I'm sharing it with you for free for your PERSONAL USE ONLY. You can grab it here.
Now, what next?
Tuesday, September 17, 2013
Just in time for football! Go Badgers!
I am excited to share some new wall art in my Etsy shop! A tribute to my alma mater the Wisconsin Badgers - I bring you subway art Badger style. The print is complete with phrases, places, and other notable items that are familiar to Badger fans.
I have two versions of this work in my shop. You can grab the cardinal red & white version you see here as an instant download OR you can have the background changed to the color of your choice. The file is delivered as a 16 x 20 inch JPEG and is high-quality and print ready. There is a 1.5 inch border making it perfect for gallery wrapped canvas - which is exactly how mine will be printed. The background and text are lightly distressed to provide a vintage feel.
Saturday, September 14, 2013
A Nautical First Birthday
Well, it happened. The little man turned one. It's hard to believe that first year of life has already been accomplished. So much change in so little time - now that is certainly something to celebrate. For me, I enjoy being able to create some crafty items to spruce up the big party but with two little ones running (or toddling around) time is limited. So even more fun, is seeing how everything I'd created over the span of many (maybe six) weeks came together. No one thing was incredibly time consuming, just hard to find any time! And everything was cheap and easy! So I'm excited to share how our little Owen's nautical first birthday came together.
I wanted to take some cute photos of the little guy on his special day and thought I should make a prop for that. If you have kids, then you have cardboard! I grabbed a large piece and cut out a big number one. I used some red acrylic paint and then a star stamp using mod podge that I sprinkled with blue glitter. Fast, easy, and pretty cute. Now, to just get that baby to hold it just right for the camera. ;)
And now, on to the party. First, a few things to be said on the theme of nautical. It's pretty general. That can take you many different ways but that's what I loved about it - I could toss in whatever I could make work. I choose to stay with very traditional colors - Red, Blue, and Lt. Blue. This helped me to not only find supplies easily but anything that had to do with the 4th of July also seemed to work in well!
DECOR
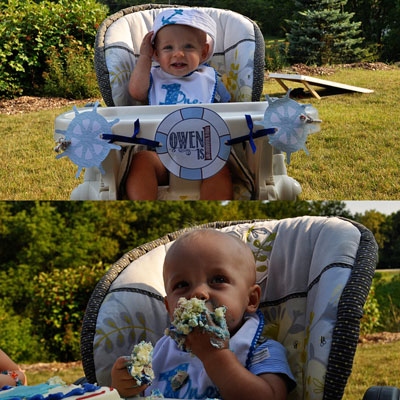
I have found that keeping things simple is often the easiest way to set the stage for your party. Not pictured, but I did make a welcome sign for our door that was similar to the high chair banner pictured here. It let everyone know that the party was happening in our back yard. That way we didn't have to keep running to the door to welcome guests as they arrived. The door sign and high chair banner were designed in Illustrator along with the fun ship wheels. I then placed them as .PNG files in my Silhouette software to print and cut. If you've not used .PNG files in the software before, it's super easy! I describe how to do that in this post here.
For my older son, I made him a special shirt to wear at his parties so I wanted to do the same here, but I also wanted him to feel included on his little bro's special day so I made two shirts this time. The birthday boy, Owen, had a little sailboat and older brother got "Captain in training"...but if you have a two year old, you know they pretty much take charge of most situations! :) I used the Avery iron on transfer paper and my home printer.
FAVORS
The children attending were 4 years and under so I wanted to do something fun for favors but nothing with a bunch of little toys in it. So I picked up some colorful sand buckets at Michael's on the cheap. I then designed a name label for each child which I printed onto the Silhouette clear sticker paper. After cutting with my Silhouette, I put them on the bucket. I did this same thing for some colorful water bottles I found as well. Also included was a sailor hat. I had found a dozen of them on Amazon and did a little fabric stencil of anchors and sailboats. They didn't turn out the greatest but they were still pretty darn cute. Finally, we had a squirt gun for each kiddo - and that led to a lot of fun for them outside! Lastly, I used one bucket to put a Thank You treat of salt water taffy for each guest to take when they left for home.
THE FOOD
I like to keep the food pretty simple so I too can have fun at the party, but that doesn't mean that you can't set it up to look festive! I found red and blue tablecloths, paper plates and napkins at my local Michael's store. With the sales and coupons they have, you can find this stuff fairly cheap. They tend to only have bold colors but that worked fine for this party! To incorporate my theme, I knotted some sailor rope around the utensils and put some golffish in a fish bowl. We used a 4th of July table cloth for the beverage table.
A few things I've learned over the years with parties has been that I can fit way more food and make the buffet look extra fancy just by adding some height! I use boxes or anything really under the table cloth to make places for the serving trays. It looks nice, let's you fit more in, and makes it easier for your guests to reach for things. It was also great to put out the lemonade, iced tea, water, and mixers in a way that guests could help themselves. There's always a lot going on at kiddos parties so it was great to know everyone could refresh their drinks as they wanted to. I also used the Silhouette to cut out some confetti in the shape of ship wheels and anchors. It was easy but tedious to pick up off the sticky mat - definitely needed those tools!
The cake was made locally by Delicately Delicious. I love how it turned out and it tasted great too! I used the number one I had made as decoration and also set the main cake off with some fish net.
And it wouldn't be a good birthday post if I didn't include a picture of our cutie enjoying his cake! He really took charge of it, both hands in, and enjoyed it. And no, we didn't let him finish the whole thing! I think he would have exploded!
All in all, it was a really fun day! Everyone had fun, ate well, and the birthday boy enjoyed! I had so much fun pulling this together for him too! Happy First Birthday Owen!!
I wanted to take some cute photos of the little guy on his special day and thought I should make a prop for that. If you have kids, then you have cardboard! I grabbed a large piece and cut out a big number one. I used some red acrylic paint and then a star stamp using mod podge that I sprinkled with blue glitter. Fast, easy, and pretty cute. Now, to just get that baby to hold it just right for the camera. ;)
And now, on to the party. First, a few things to be said on the theme of nautical. It's pretty general. That can take you many different ways but that's what I loved about it - I could toss in whatever I could make work. I choose to stay with very traditional colors - Red, Blue, and Lt. Blue. This helped me to not only find supplies easily but anything that had to do with the 4th of July also seemed to work in well!
DECOR
I have found that keeping things simple is often the easiest way to set the stage for your party. Not pictured, but I did make a welcome sign for our door that was similar to the high chair banner pictured here. It let everyone know that the party was happening in our back yard. That way we didn't have to keep running to the door to welcome guests as they arrived. The door sign and high chair banner were designed in Illustrator along with the fun ship wheels. I then placed them as .PNG files in my Silhouette software to print and cut. If you've not used .PNG files in the software before, it's super easy! I describe how to do that in this post here.
For my older son, I made him a special shirt to wear at his parties so I wanted to do the same here, but I also wanted him to feel included on his little bro's special day so I made two shirts this time. The birthday boy, Owen, had a little sailboat and older brother got "Captain in training"...but if you have a two year old, you know they pretty much take charge of most situations! :) I used the Avery iron on transfer paper and my home printer.
I do love to digital scrapbook as well so I figured why not show off some of the pages I had of Owen's first year! I purchased this Recollections stand to fit my 12x12 pages in. There were some from his hospital birth and NICU stay, as well as monthly update pages. I noticed several people checking them out and I think it was a fun way to show just how much he changed over that first year.
And finally, I do love a great birthday banner! I wanted the decor to be more modern than cutesy so I decided to design some papers with newsprint background and stripes and stars that looked painted and stamped on. I used some sailor's rope to string the whole thing up. I had some on hand from a past crafting project but you can pick some up at your local hardware store. Generally, they can just cut you the length you need.
FAVORS
The children attending were 4 years and under so I wanted to do something fun for favors but nothing with a bunch of little toys in it. So I picked up some colorful sand buckets at Michael's on the cheap. I then designed a name label for each child which I printed onto the Silhouette clear sticker paper. After cutting with my Silhouette, I put them on the bucket. I did this same thing for some colorful water bottles I found as well. Also included was a sailor hat. I had found a dozen of them on Amazon and did a little fabric stencil of anchors and sailboats. They didn't turn out the greatest but they were still pretty darn cute. Finally, we had a squirt gun for each kiddo - and that led to a lot of fun for them outside! Lastly, I used one bucket to put a Thank You treat of salt water taffy for each guest to take when they left for home.
THE FOOD
I like to keep the food pretty simple so I too can have fun at the party, but that doesn't mean that you can't set it up to look festive! I found red and blue tablecloths, paper plates and napkins at my local Michael's store. With the sales and coupons they have, you can find this stuff fairly cheap. They tend to only have bold colors but that worked fine for this party! To incorporate my theme, I knotted some sailor rope around the utensils and put some golffish in a fish bowl. We used a 4th of July table cloth for the beverage table.
A few things I've learned over the years with parties has been that I can fit way more food and make the buffet look extra fancy just by adding some height! I use boxes or anything really under the table cloth to make places for the serving trays. It looks nice, let's you fit more in, and makes it easier for your guests to reach for things. It was also great to put out the lemonade, iced tea, water, and mixers in a way that guests could help themselves. There's always a lot going on at kiddos parties so it was great to know everyone could refresh their drinks as they wanted to. I also used the Silhouette to cut out some confetti in the shape of ship wheels and anchors. It was easy but tedious to pick up off the sticky mat - definitely needed those tools!
The cake was made locally by Delicately Delicious. I love how it turned out and it tasted great too! I used the number one I had made as decoration and also set the main cake off with some fish net.
And it wouldn't be a good birthday post if I didn't include a picture of our cutie enjoying his cake! He really took charge of it, both hands in, and enjoyed it. And no, we didn't let him finish the whole thing! I think he would have exploded!
All in all, it was a really fun day! Everyone had fun, ate well, and the birthday boy enjoyed! I had so much fun pulling this together for him too! Happy First Birthday Owen!!
Subscribe to:
Posts (Atom)